Redundant Array of Independent Disks or RAID, systems are popular in the data storage industry because of the improved performance and fault tolerance they provide. Nevertheless data loss may still occur even with RAID arrays despite these benefits. Data loss from a RAID system may be a terrifying event regardless of the cause (hardware failure, software corruption or human mistake). Fortunately there is hope in the form of Stellar RAID Data Recovery Tool which efficiently recovers lost or inaccessible data. In order to help you get your data back this article will walk you through the steps of using Stellar RAID Data Recovery Tool.
Stellar Data Recovery Software
Stellar Data Recovery Inc. is an industry leading company that can help customer to retrieve deleted, lost or otherwise unrecoverable files from a wide range of storage media. Stellar is well known for its trustworthy and intuitive interface and its extensive data recovery capabilities can handle jobs involving hard disks, solid state drives (SSDs), USB drives, memory cards, RAID, NAS systems. The program can restore lost data in the event of formatting mistakes, corruption, hardware failure, unintentional deletion and many other data loss situations. Stellar Data Recovery has cutting edge scanning methods that guarantee maximal data recovery without compromising the integrity of the files that are recovered.
RAID and Data Loss Overview
Redundant Array of Independent Disks or RAID is a data storage virtualization technology in which multiple hard disks are combined together to form one or more logical units to provide redundancy, reliability, and scalability.
RAID 0: Stripes data across many circles for better performance without displaying obvious repetition.
RAID 1: Ensures data redundancy and enhanced fault tolerance by mirroring it across drives.
RAID 5: Balances performance and redundancy by distributing data and parity information over three or more drives.
RAID 6: As RAID 5 but with double parity which can withstand the failure of two disks.
RAID 10: Boosts speed and provides redundancy by combining RAID 1 and RAID 0.
Regardless of these advantages RAID arrays are nevertheless susceptible to failure in the event of disk corruption, controller failure, improper reconfiguration or failure of more than one disk. Data recovery solutions for RAID arrays are useful in this situation.
Stellar RAID Data Recovery Tool
You may retrieve data from a wide variety of RAID arrays with Stellar RAID data recovery software all without needing the original RAID controller. It can manage both software based and hardware RAID arrays and it supports RAID 0, 1, 5, 6 and 10. Professionals and beginners alike will appreciate the tool’s intuitive design and robust functionality.
Step-by-Step Guide to Recover Data
Step 1: Download and Install STELLAR® DATA RECOVERY TECHNICIAN
Just follow the on screen prompts to install the program. To prevent accidentally overwriting the data you are attempting to recover make sure your system has sufficient free space and is installed on a non RAID drive.
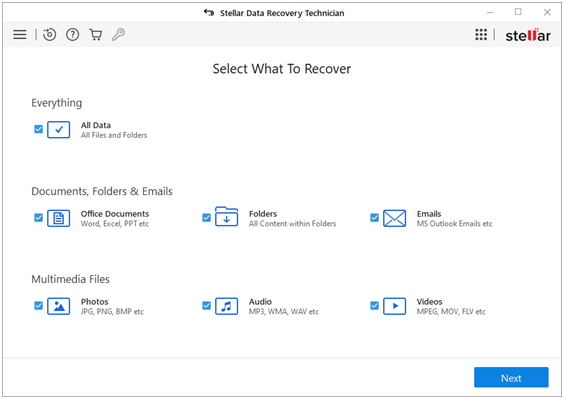
Step 2: Launch the Software and Select RAID Recovery
Choose “RAID Recovery” from the main interface’s available choices. Data recovery from RAID arrays is the exclusive domain of this technique.
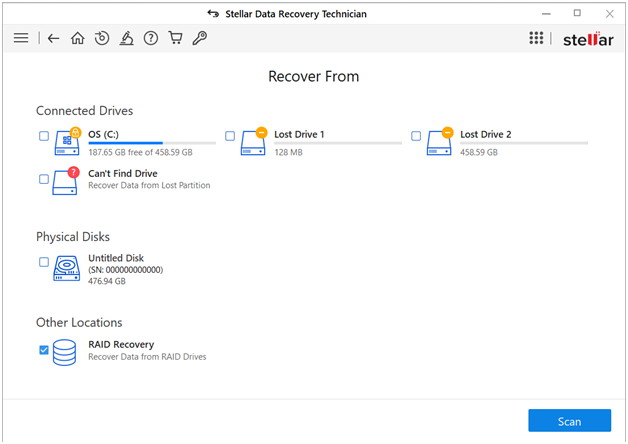
Step 3: Choose the RAID Configuration
When prompted choose your RAID setup in the program. Sort the RAID levels from 0 to 10 according to your RAID configuration.
Join the RAID array’s hard disks to your computer by plugging them in. The linked drives will be detected automatically by the program.
Step 4: Enter RAID Parameters
Provide the RAID settings if you are familiar with them. Among them you may find the parity order, disk order and block size. You may choose to have Stellar’s tool auto detect these parameters if you’re not sure what they are.
Permit the program to do the RAID configuration scanning and building. The complexity and size of your RAID array will determine how long this operation could take.

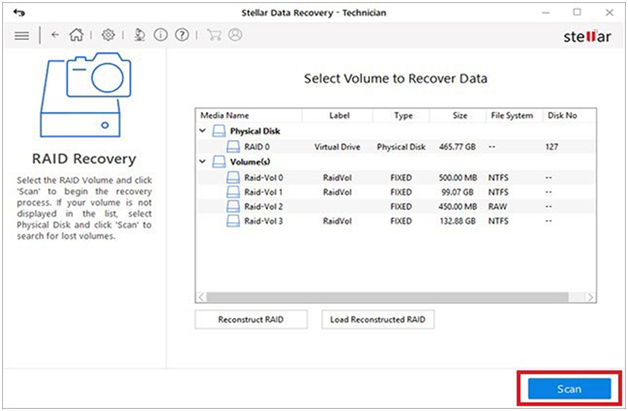
Step 5: Scan for Lost Data
After you’ve set up RAID you may begin scanning disks or volumes for missing data.
To scan, use the “Scan” button. In order to find recoverable documents, the application will begin screening. How long this takes depends on the data volume and the state of the disks.
Step 6: Preview and Recover Data
The application will provide a list of recoverable documents when the scan is complete. You may check the files integrity and make sure they’re the ones you need by previewing them.
After you’ve chosen which files to restore hit the “Recuperate” button?
Select a location to store the files that have been retrieved. To avoid data overwriting make sure this location is not in the RAID array.

Step 7: Save Recovered Data
Put the recovered data somewhere safe.
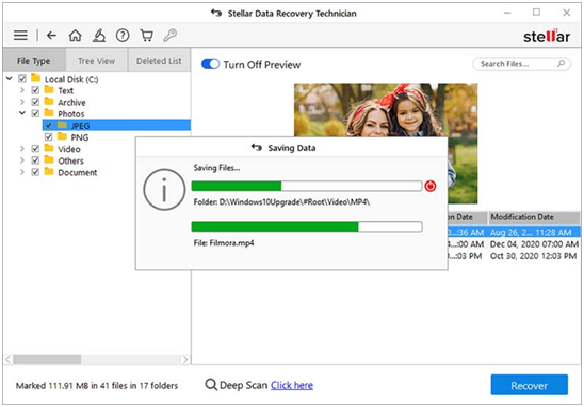
To be sure the recovery worked check the restored files for corruption.
Tips for Successful RAID Data Recovery
In the case that you discover data loss you should immediately cease utilizing the RAID array in order to avoid more damage or overwriting.
Before you try to recover your data you should not run any repair tools or rebuild the RAID array.
When taking apart a RAID array make sure to mark each disk and keep track of their sequence. For a good recovery the sequencing is crucial.
Data loss might be devastating in the future therefore its important to back up your data often.
Conclusion
Although losing data from a RAID system is inconvenient it is Possible to recover lost data with the correct methods and equipment. Recovering deleted files from RAID arrays is a breeze using Stellar RAID Data Recovery Tool. You may lessen the blow of data loss on your operations and increase the chance of a successful recovery by following to the methods indicated in this guidance. When dealing with RAID disks use extreme caution and consult an expert if you have any doubts regarding the recovery procedure.